Navigation Links for Sectioning Divisions
\Configure{crosslinks} provides hooks to create navigation links across sub-documents created from a long document like book where chapters are broken into separate HTML documents or a long article where sections might be cut into separate documents for easy browsing. \CutAt{...} helps to split a long document at the desired section or chapter or part units. When documents are split into smaller units, we need navigation links across various split units. TeX4ht provides an important function, \Configure{crosslink}, which is explained below how various navigational links can be created and customized.
\Configure{crosslinks}.....................8
| #1 | left delimiter |
| #2 | right delimiter |
| #3 | next |
| #4 | previous |
| #5 | previous-tail |
| #6 | front |
| #7 | tail |
| #8 | up |
An example of the above configuration setup shall be as given below:
  \Configure{crosslinks}
   {\texttt{<}} {\texttt{>}}
   {Next}{Prev}
   {PrevTail}{Front}
   {Tail}{Up}
See the figure below which shows the results of the above code:
If you want to re-order the way the navigation widgets are displayed, you might make use of Configure{crosslinks*} command. It has seven arguments, where, six arguments have values while the last one (seventh) shall be empty.
\Configure{crosslinks*}.................1--7
Available options and their defaul order: next, prev, prevtail, tail,
front, up. The last argument must be empty. See below:
Default:
  \Configure{crosslinks*}
    {next}
    {prev}
    {prevtail}
    {tail} {front}
    {up}
    {}
\Configure{crosslinks+}.....................4
| #1 | before top menu |
| #2 | after top menu |
| #3 | before bottom menu |
| #4 | after bottom menu |
\Configure{crosslinks+} provides further facilities to add extra hooks to the cross linking widgets at top and bottom of the HTML document. The top cross links are omitted, if both #1 and #2 are empty. The bottom cross links are omitted, if both #3 and #4 are empty.
The following hook provides to link the document which you want to navigate to from the first page. This will be honoured unless you invoke the htlatex kind of scripts with next as one of the options.
\Configure{next}.....................1
| #1 | the anchor of the next button of the front page. |
{next+} helps to provided extra hooks in the beginning and end of the hyperlink elements in the {next} in the first page.
Configure{next+}.............................2
| #1 | before the next button of the front page, when the next option is active. |
| #2 | after the button |
Here is an example for the above hooks:
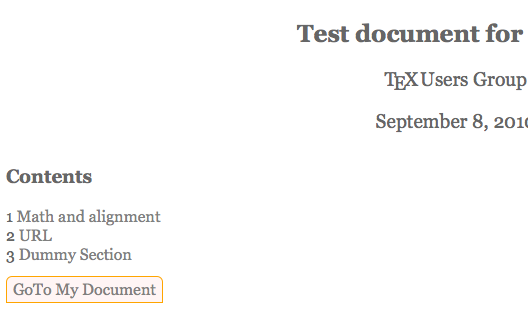
  Configure{next}{GoTo My Document}
  \Configure{next+}{\Tg<span class="clinks">}{\Tg</span>}
and will create the link widget as shown in the following screen shot of the first page of the test document.
Default: The values provided by default in Configure{crosslinks} can
be changed with the following Configure hooks.
 \ Configure{crosslinks:next}..................1
  \Configure{crosslinks:prev}..................1
  \Configure{crosslinks:prevtail}..............1
  \Configure{crosslinks:tail}..................1
  \Configure{crosslinks:front}.................1
  \Configure{crosslinks:up}....................1
| #1 | local configurations for the delimiters and hooks |
\Configure{crosslinks-}.....................2
Asks to show linkless buttons with the following insertions.
| #1 | before |
| #2 | after |
The default values are used, if both #1 and #2 are empty.
Example
  \Configure{crosslinks-}{}{}
  \Configure{crosslinks-}
     \{HCode{<span class="hidden">}[}
     {]\HCode{</span>} }
  \Css{span.hidden {visibility:hidden;}}
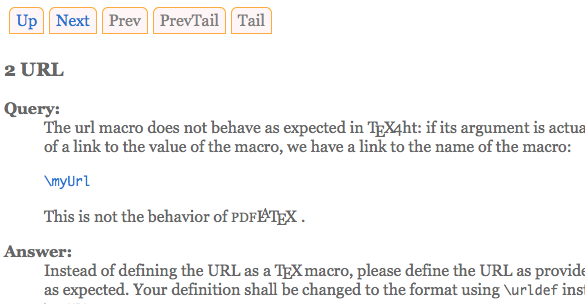
A typical example of the cross links for navigation is given below along with screenshot of the resulting HTML page.
\Configure{crosslinks}
  {\Tg<td class="clinks">} {\Tg</td>}
  {Next}{Prev}
  {PrevTail}{Front}
  {Tail}{Up}
\Css{.clinks{border: solid 1px; border-color: orange;
    padding-left: 6px; padding-right: 6px;
    padding-top: 3px; padding-bottom: 3px;
    border-radius: 6px; background-color: #fff5f5;
    -moz-border-radius: 6px 6px 0px 0px;
    -webkit-border-radius: 6px 6px 0px 0px;}}
\Css{a:visited{color: gray; text-decoration: none;}}
\Css{a:link{color: #27d; text-decoration: none;}}
\Css{a:hover{color: blue; text-decoration; none;}}
  \Configure{crosslinks*}
    {up}
    {next}
    {prev}
    {prevtail}
    {tail} {front}
    {}
\Configure{crosslinks+}
   {\HCode{<table cellspacing="5"><tr>}}
   {\HCode{</tr></table>}}
   {\HCode{<table cellspacing="5"><tr>}}
   {\HCode{</tr></table>}}
Cross-linking
Cross-linking assumes much importance in hyperlinked documents. There are different kinds of links in a document, namely, internal links created by simple \label{...} and \ref{...} mechanism of LaTeX, linking index entries to respective locations in the document body, linking table of contents to the respective entries, hyperlinks created by hyperref package or user defined macros which link content to external URL’s, files, multimedia components, etc. TeX4ht has a generic mechanism to link various types of links. A special file, \jobname.xref is written during the translation process which is akin to the jobname.aux in LaTeX. The entries in \jobname.xref have special syntax meaningful to TeX4ht alone are read in subsequent runs and made use of to build hyperlinks in the HTML document generated.
\Link[@1 @2]{@3}{@4}...EndLink
Creates
<a href="@1#@3" name="@4" @2>...</a>
- When
@1is empty, TeX4ht will derive its value automatically. The derived value will be the file name containing the target@3. \Linkmay be followed by-, if TeX4ht needs not automatically determine (for otherlinkcommands) the file containing@4. In the present of such a flag, TeX4ht can spare a definition of one macro.- The component
[@1 @2]is optional. If omitted,@1and@2are assumed to be empty. - The
\hrefattribute is omitted when@1and@3are empty. - The name attribute is omitted when
@4is empty.
Example
  \Link{a}{}...\Endlink .....  \Link{}{b}...\EndLink
  \Link[http://foo  id="fooo"]{a}{b}...\EndLink
  \Configure{Link}..............4
Configures \Link...\EndLink so that
| #1 | replaces a |
| #2 | replaces href= |
| #3 | replaces name= |
| #4 | replaces ‘#’. If empty, the older value remains in effect. |
Example
  \Configure{Link}{a}{href=}{name=}{}
  \Configure{Link}{ref}{target=}{id=}{empty}
  \Configure{?Link}..............1
| #1 | insertion before broken links |
To help with debugging
\LinkCommand...................1 <= i <= 6
Creates a Link-like command
| #1 | tag name |
| #2 | href-like attribute |
| #3 | name-like attribute |
| #4 | insertion |
| #5 | /, if empty element |
| #6 | replacement for # (ignored if absent) |
Other types
Example
  \LinkCommandJSLink{a,noexpandjsref,name}
  defjsref="#1"{href="javascript:window.open(’#1’)"}
  \JSLink{a}{}xxEndJSLink
  \Link{}{a}\EndLink       % or \JSLink{}{a}\EndJSLink
  \Configure{XrefFile}.....................1
| #1 | names cross-references of files (appends #1 to )F and )Q entries of the .xref files). Applicable mainly implicitly within Link commands. |
Tag.....................................2
| #1 | label |
| #2 | content |
  \Ref.....................................1
  \LikeRef.................................1
| #1 | label |
\Tag and \Ref are tex4ht.sty commands introduced cross-referencing content through .xref auxiliary files.
\LikeRef is a variant of \Ref which doesn’t verify whether the labels exist. It is mainly used in \Link and edef environments.
\ifTag ..................................3
| #1 | quetioned tag |
| #2 | true part |
| #3 | false part |
\LoadRef-[prefix]+{filename.ext}{pattern}
Load the named xref-type file
| .xref | optional — .xref is assume for a default |
| + | optional — asks Ref and LikeRef commands to use expanded tags filename::tag, instead of just tag |
| [prefix] | optional — asks just for tags starting with the specified prefix. |
| – | optional — deletes the prefixes from the loaded tags |
| {pattern} | to be included only when [prefix] or + are included. States how tags are to be addressed, with the parameter symbol ‘#1’ specifying the loaded part. |
Example
  % a.tex
  \LoadRef-[to:]{b}{from:#1}   \Ref{from:filename}
                               \LikeRef{from:filename}
  % b.tex
  \Tag{to:filename}{FileName}
Example
  \LoadRef-[)F]{file}{)Ffoo##1}
  \LoadRef-[)Q]{file}{)Qfoo##1}
  \Configure{XrefFile}{foo}   \Link...\EndLink
  \LoadRef{another-file}


A question for you :
how to customize tex4ht MatHML translation, more specifically I would like to customize the translation of $imath$ to obtain <mi>ı</mi></math> with italic (ı stand for dotless i but imath is dotless i italic.
Any help would be appreciated !
François
A small addendum:
To make the following part work:
Configure{crosslinks}
{texttt{<}} {texttt{>}}
{Next}{Prev}
We had to use texttt (ie a leading backslash) in the first two arguments to get the teletype style.